Design & Engineering


Research
costume & craft
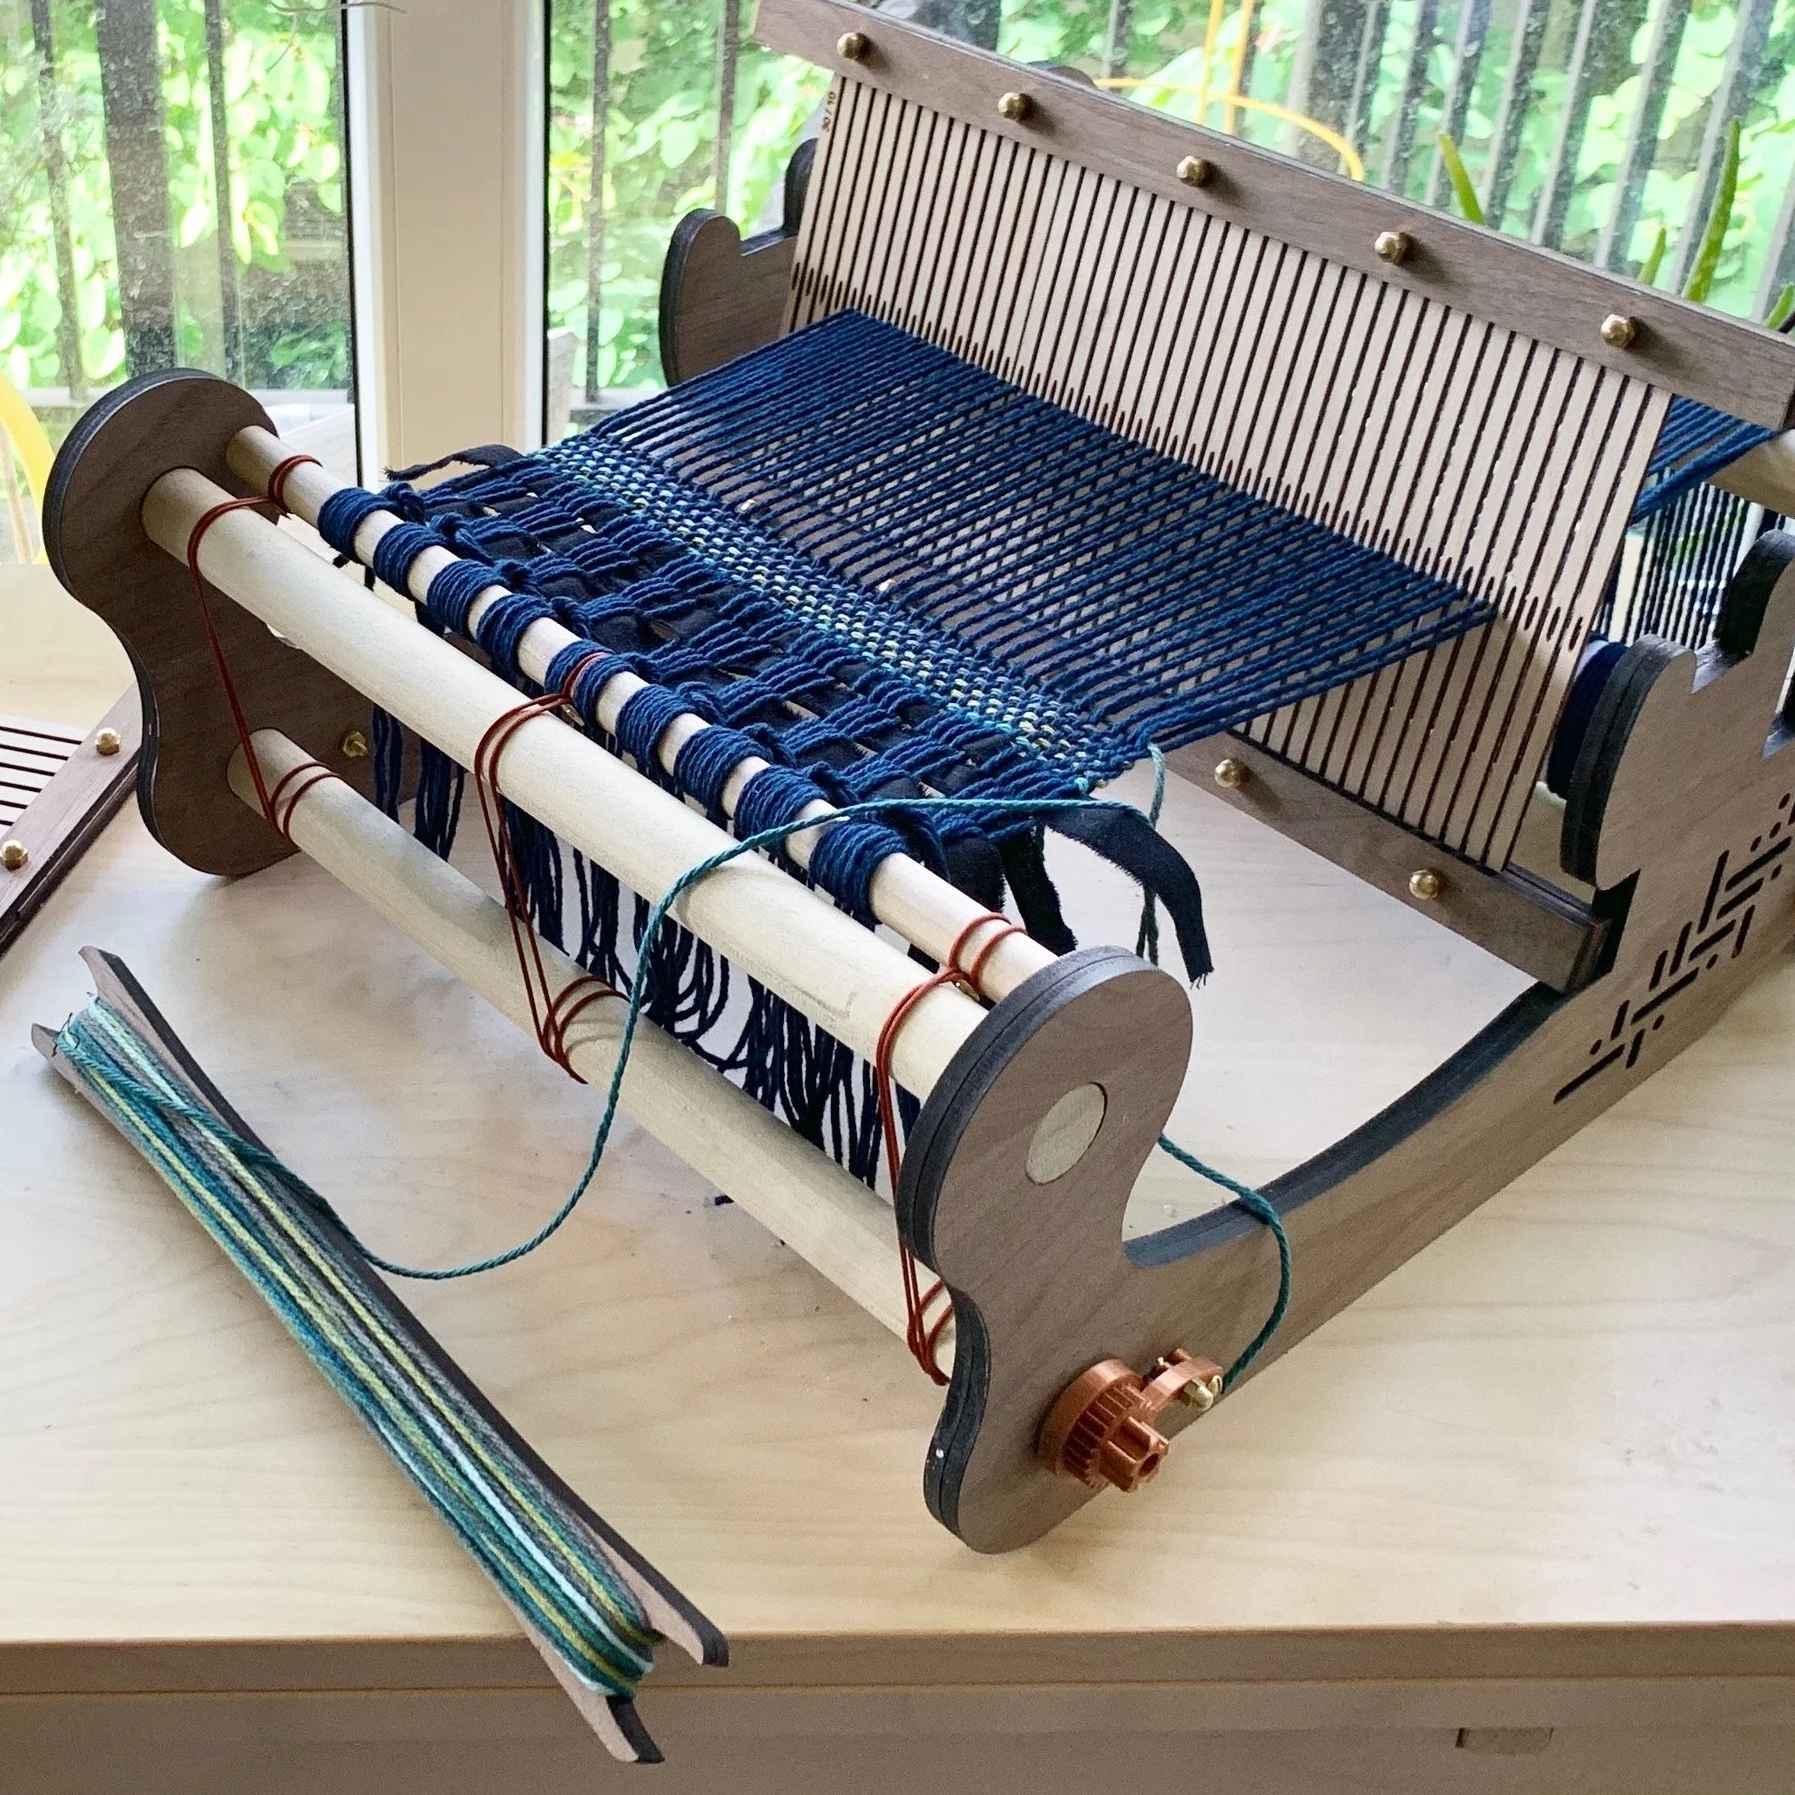
I used modern digital fabrication tools to design and build a traditional fabrication tool: a rigid heddle loom.
The original process description for this project is on my github page.
I researched styles of looms, and based my design on some existing ideas. I wanted to make a functional and practical tool, but one that also is a pleasure to see and use.
I am a beginner at weaving, but I love creating and working with textiles and soft goods, so it's a medium that appeals to me. This project was a really satisfying way to combine my digital fabrication skills with my affinity for fiber art.
I modeled the frame and the ratchet mechanism components in Onshape, incorporating stock parts and combining them in a virtual assembly.
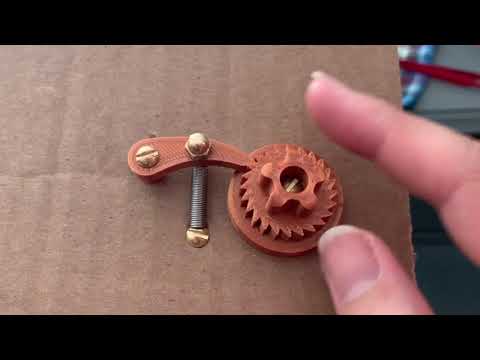
My loom has a custom ratchet mechanism, which I modeled in Onshape. After this test on a piece of cardboard, I 3D printed four of them (two with clockwise motion, two with counterclockwise motion) for the lower dowels in the loom frame.
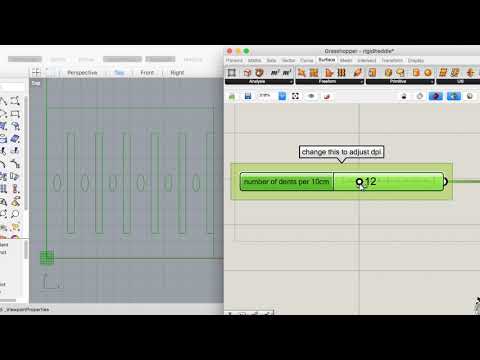
The distinguishing component of this style of loom is the heddle: the piece that separates and manipulates the warp yarns. Rigid heddles contain vertical bars (reeds) with holes and spaces (dents) that are sized and spaced according the the bulk of the fiber the weaver chooses to use. The size and spacing of the reeds and dents is referred to as the “dent ratio” of the heddle.
Because of the variable nature of the rigid heddle concept, it was a perfect use case for parametric CAD modeling. I designed the reed pieces parametrically in Rhino/Grasshopper, so that I can resize the file to any standard dent ratio.
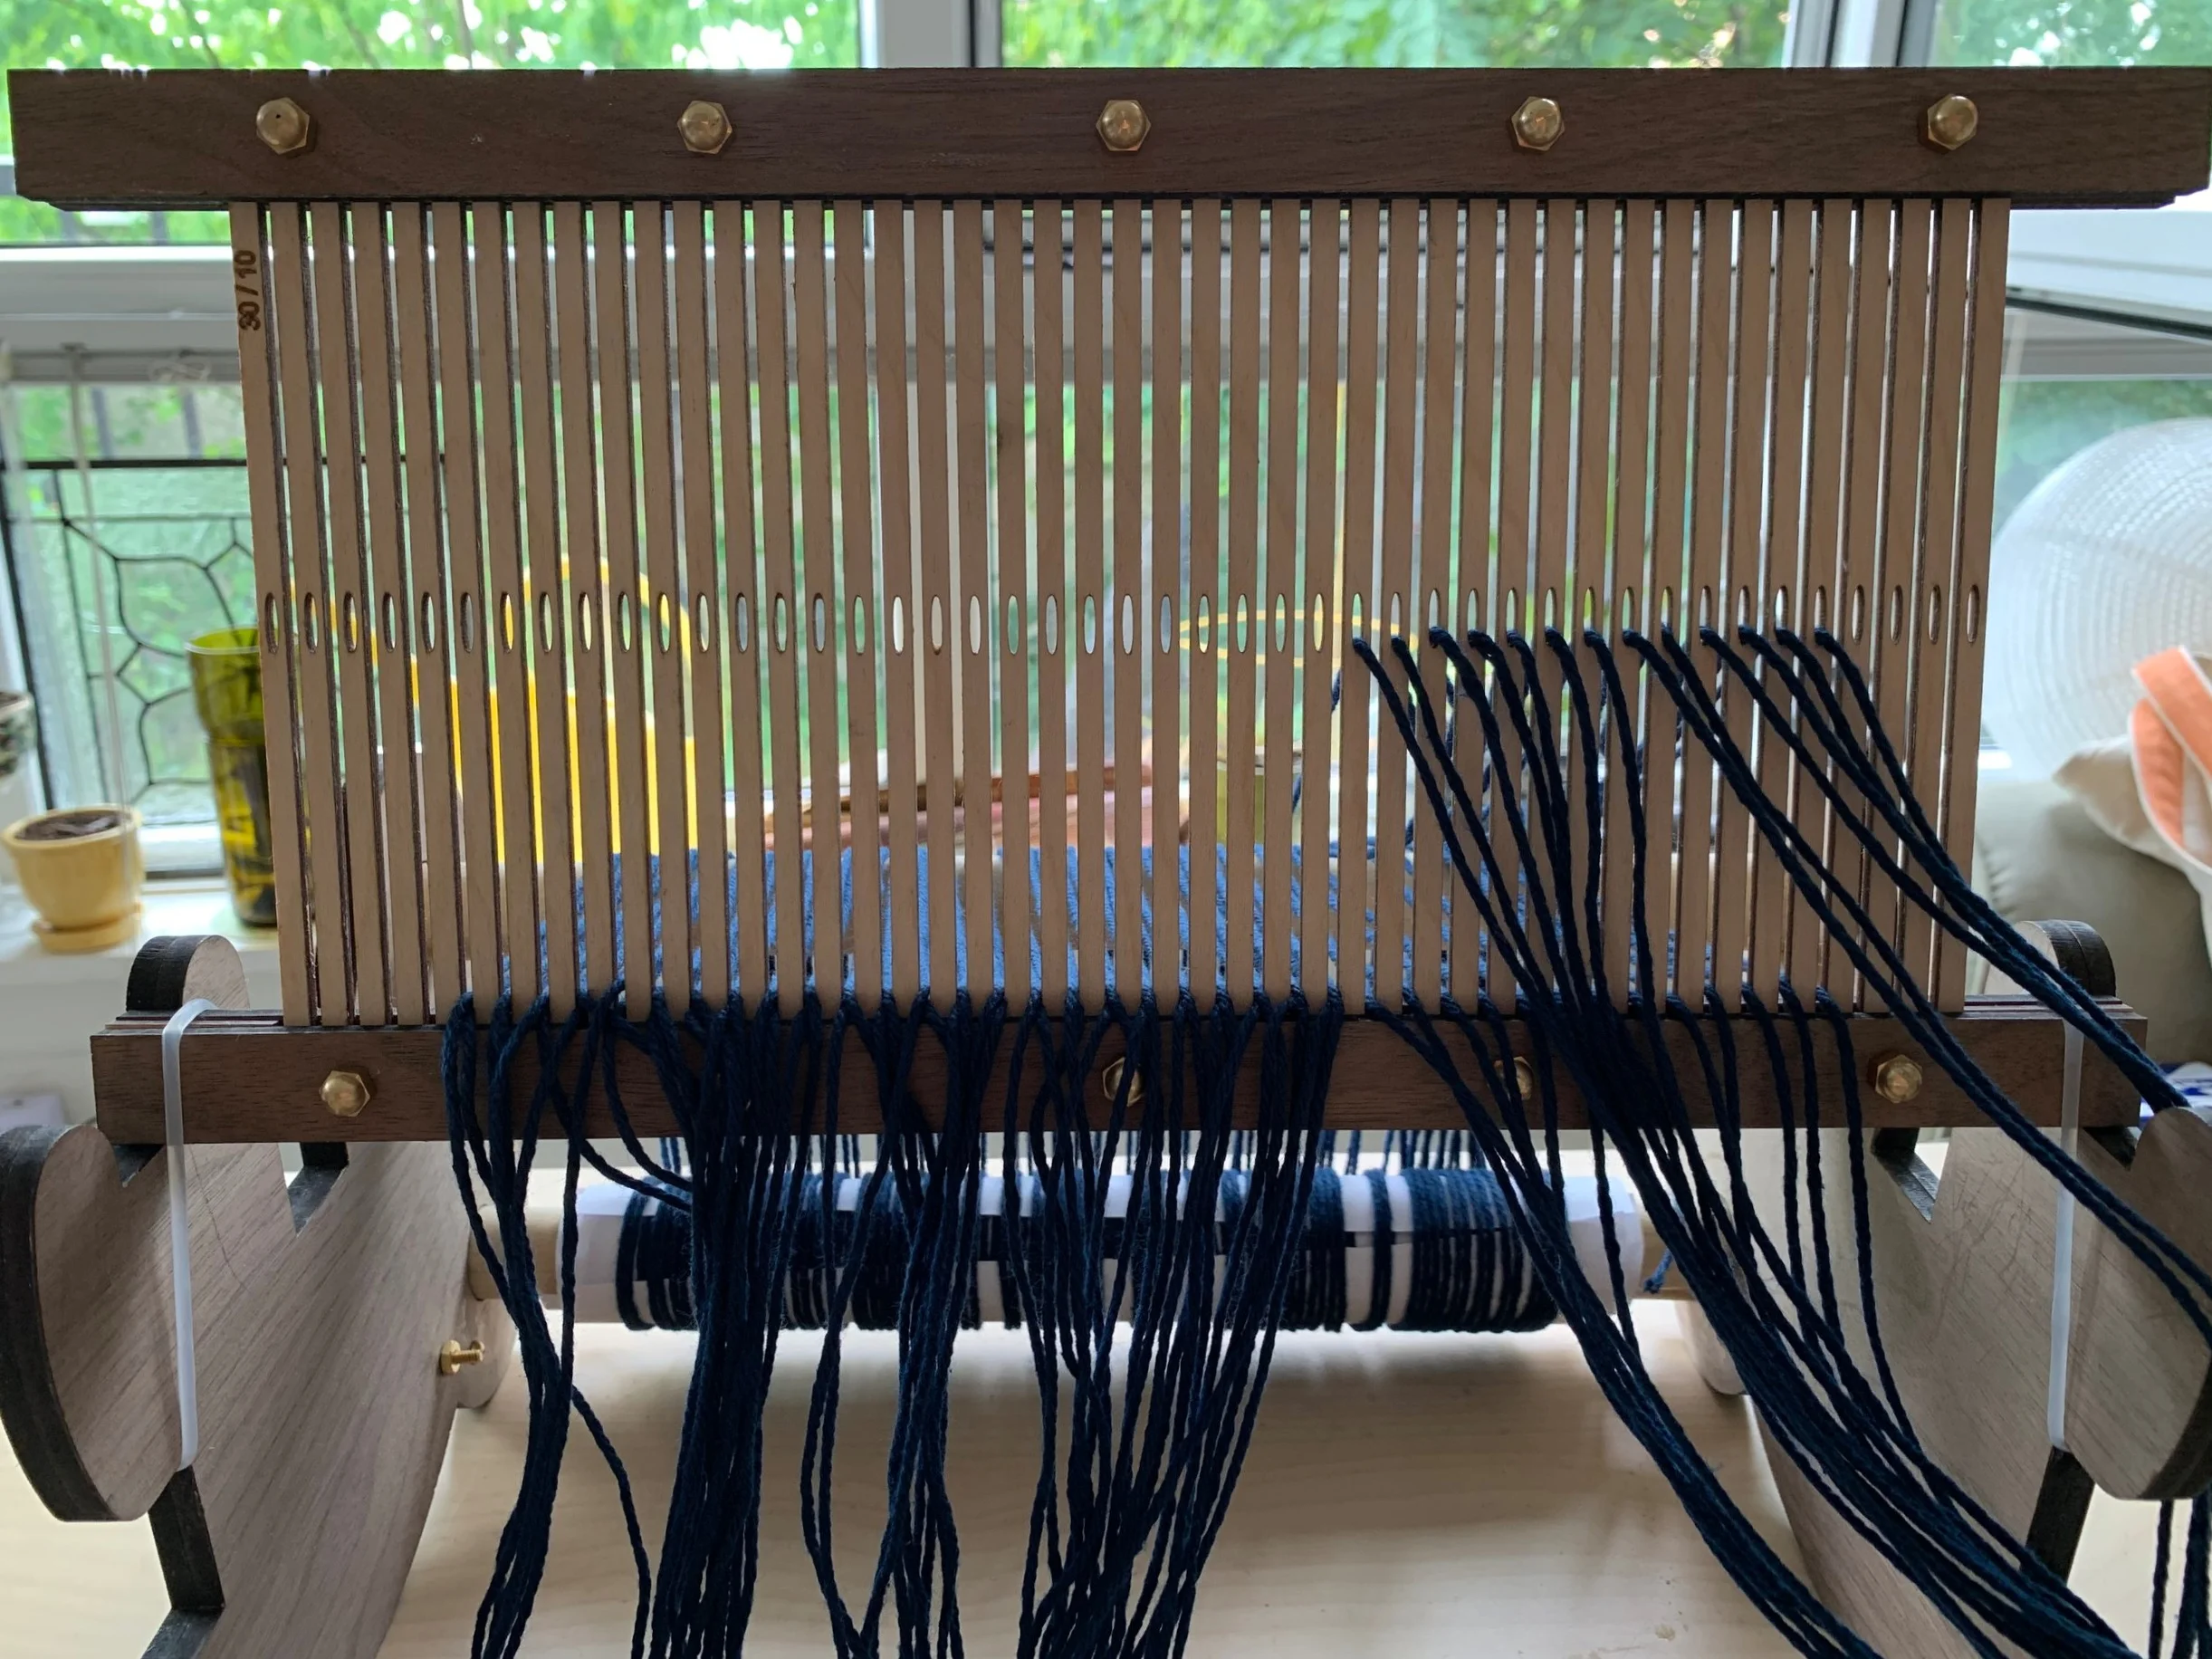
My loom accommodates a 30cm wide heddle, which I designed in 3 separate pieces that are sandwiched between top and bottom bars, fastened with some stock parts. The heddle can be easily taken apart to insert reeds with different dent ratios.
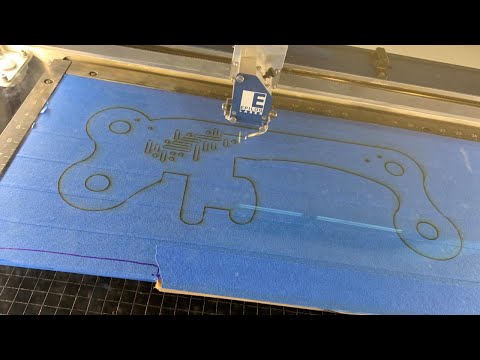
The frame of the loom, the top and bottom bars on the heddles, and the shuttle are laser cut out of 5mm walnut veneer plywood. The reed parts of the heddles are laser cut from 3mm birch plywood. I exported all of my CAD files from Onshape and Rhino, and used Illustrator to layout my cutting jobs and add rastered labels to the heddles.
While building and setting up my loom, I confirmed that it is functional but also took note of opportunities for design improvements. This is an ongoing project.
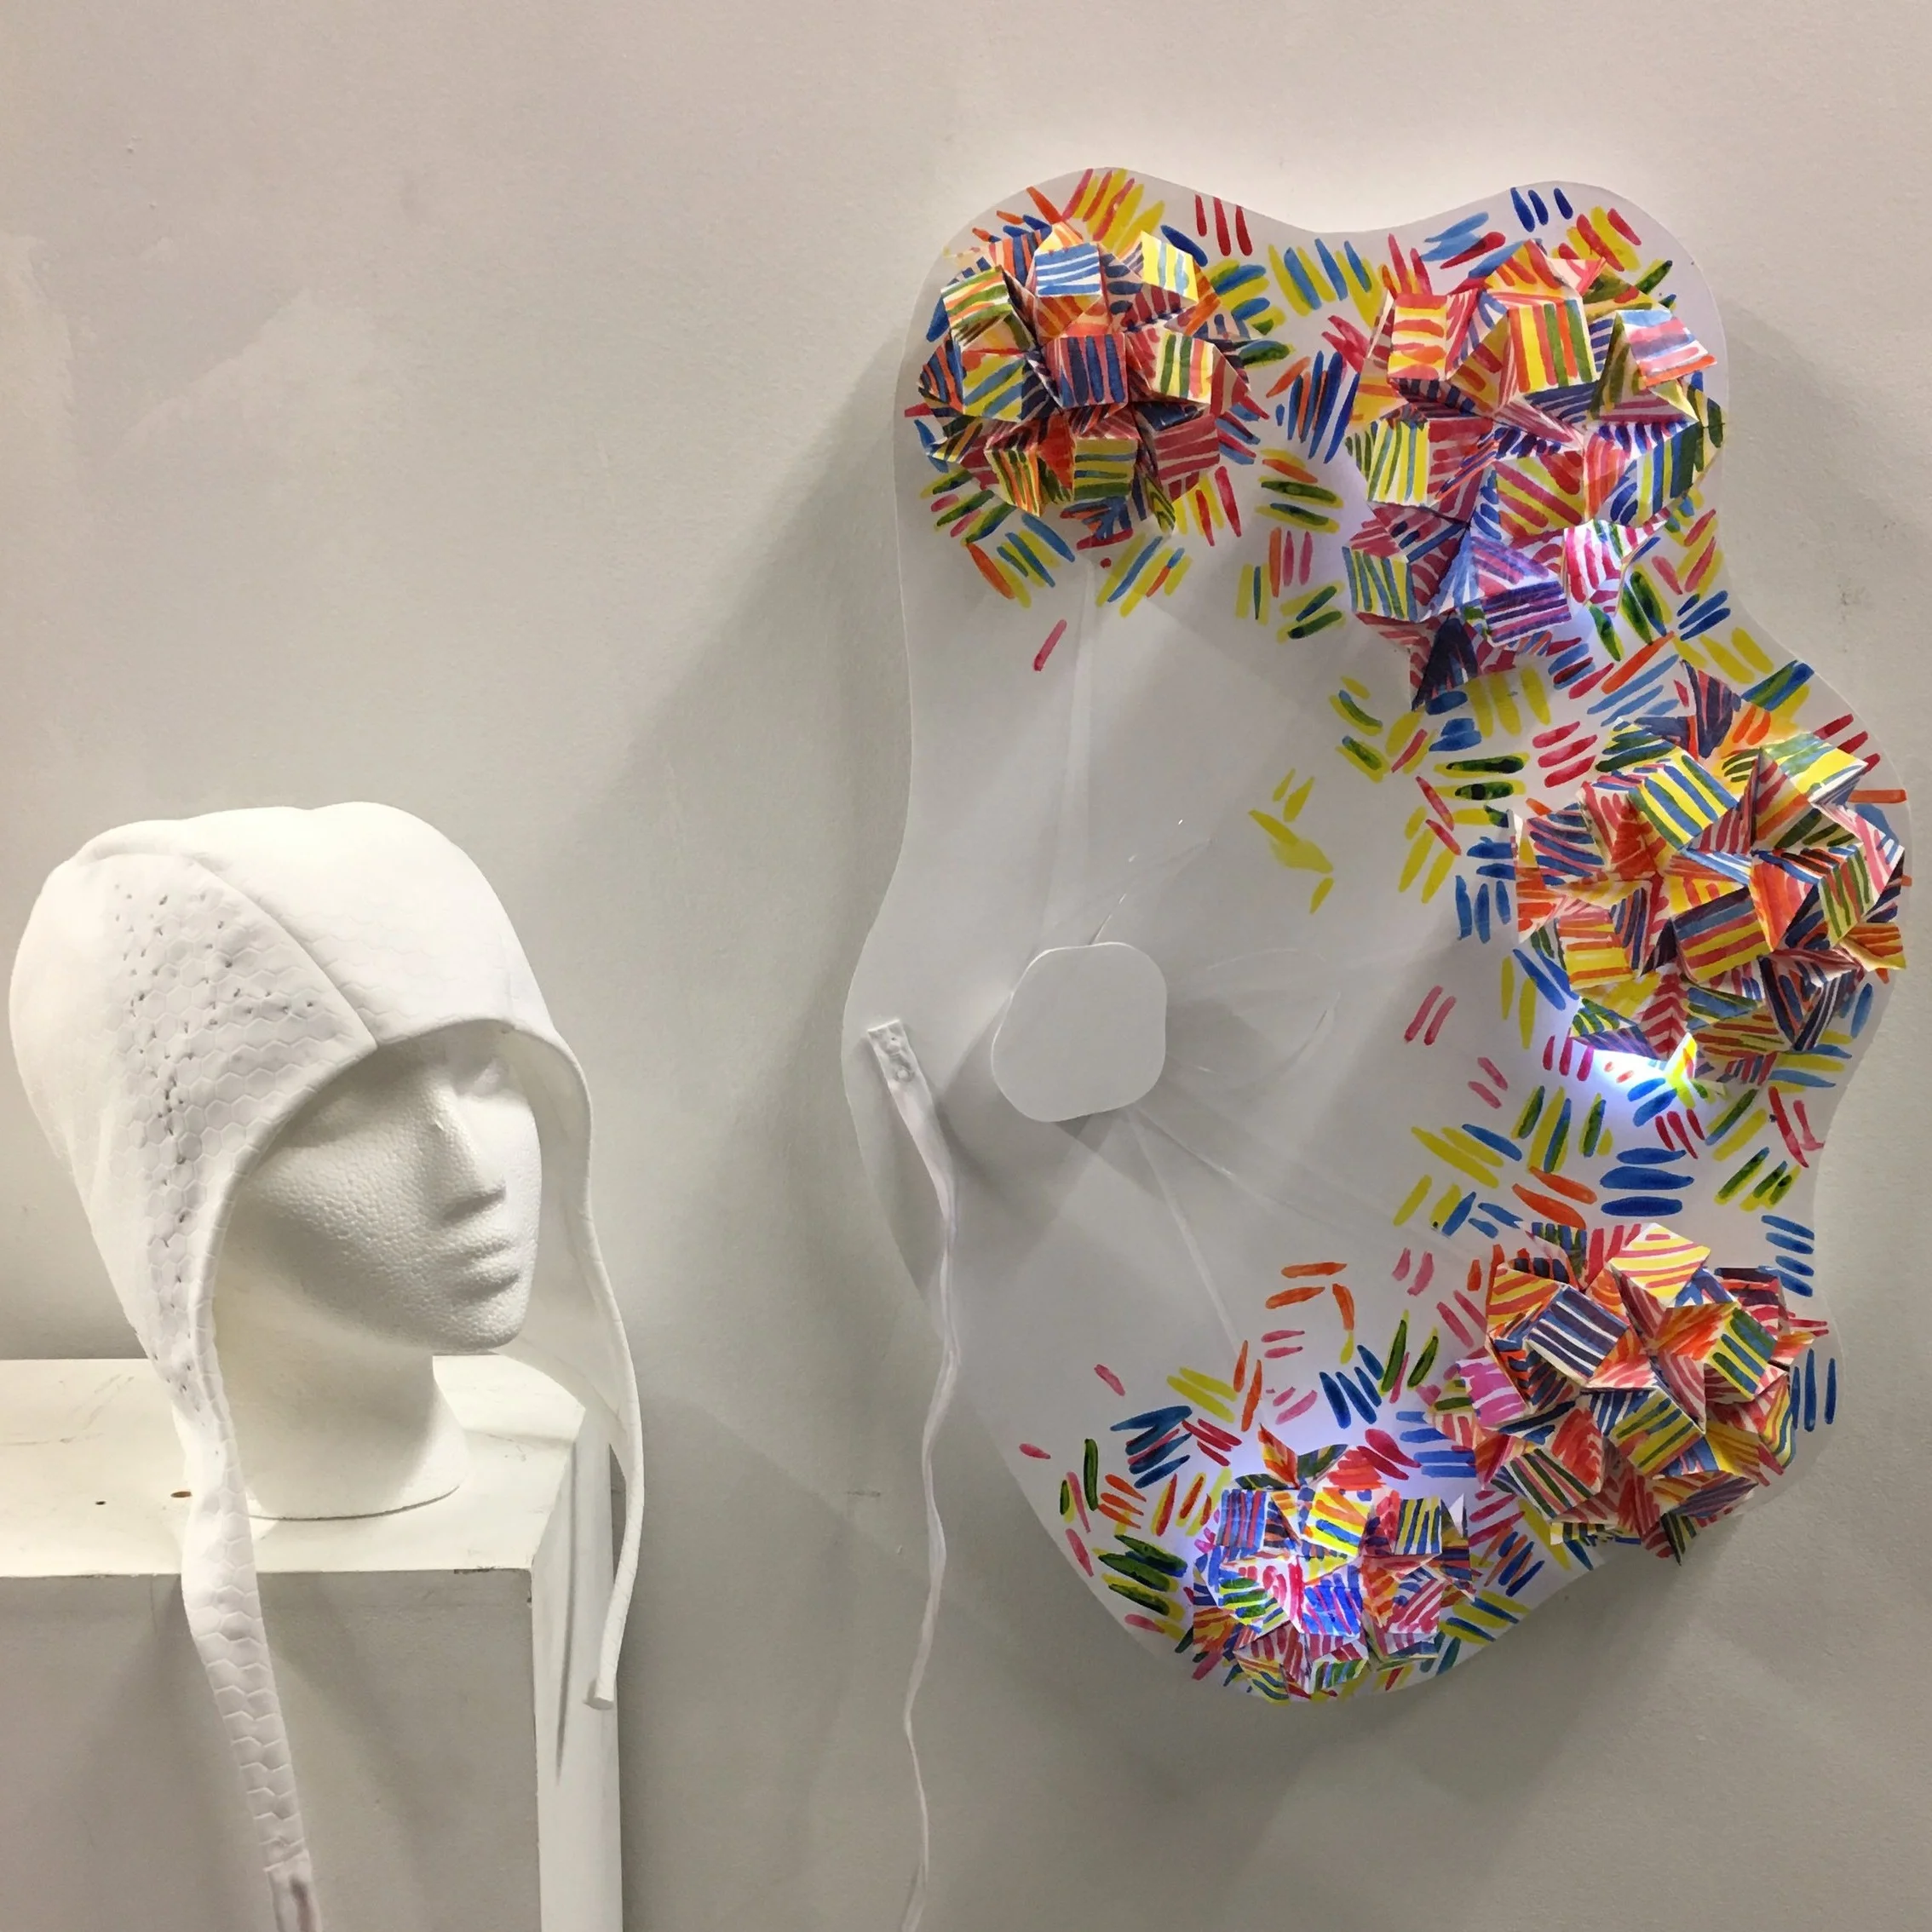
An interactive e-textile representation of a visual migraine aura, made with fabric, paper, and electronic components.
The original writeup of this piece is on the DXARTS SoftLab Blog.
This piece was also featured in Opulent Mobility 2018, an annual art exhibit in Los Angeles. The Opulent Mobility project is “a groundbreaking collaborative effort to re-imagine mobility, disability and access.”
A soft fabric hat with pressure sensors is connected to a wall-mounted kinetic sculpture, consisting of brightly handpainted painted paper origami tessellations with LED lights embedded underneath them. When the wearer applies pressure to one side of their head through the hat, the origami pieces pulsate and blink faster, simulating the visual hallucination symptoms of a typical migraine aura.
The hat has a flexible pressure sensor integrated into the fabric. Wires from the sensor are run through the extended ribbon and connect to the wall-mounted piece with snaps.
The fabric cap, shown inside-out, has conductive thread embroidered into the inside.
Before assembly: conductive copper taffeta, and velostat (a piezoresistive material, meaning its conductivity decreases when pressure is applied to it). The taffeta is affixed with iron-on adhesive to another layer of the soft white fabric, so that the inside of the hat is comfortable and the sensor is insulated. The pieces are patterned into a shape that will form comfortably and smoothly around one side of the head, from the temple to the back of the neck.
The velostat is basted to the conductive taffeta piece with plain non-conductive thread, leaving the bottom open for attaching the connection from the taffeta to the microcontroller. This piece was sewn into the hat with the copper-threaded embroidery on the opposite side of the velostat.
The wall-mounted piece consists of nine LED lights, a standard servo, and the pressure sensor connections, all controlled by an Arduino Lilypad. The electronics are powered by a rechargeable LiPoly battery. I made the connections with copper tape, copper thread, jump wires, and solder, using tape to insulate them from each other while keeping the whole assembly as low-profile as possible.
The entire piece runs on some simple code I wrote for the Arduino. When powered on and in a resting state, it blinks slowly and does not move. When the pressure sensors in the hat are activated, the blinking speed increases and the origami pulsates.
The origami tessellations are connected to the servo arms via clear heavy-gauge poly filament, affixed to the center point of each origami piece and threaded through an anchor loop on the board. When the servo turns the arms, it pulls and releases the filament, causing the origami to pulsate.
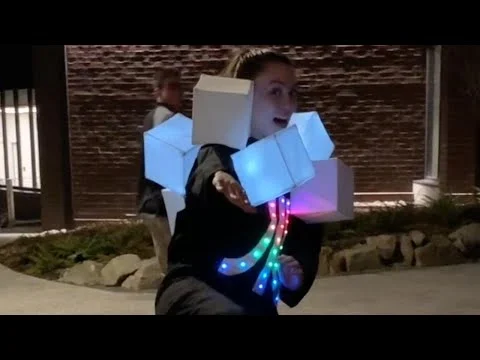
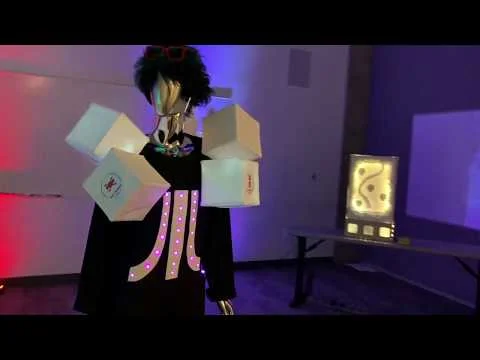
The 8-Bit Atari Heroine is a collaborative e-textile cosplay originally created for the Atari Women Project’s first event at Emerald City Comic Con in 2019.
This piece was subsequently featured at Living Computers: Museum + Labs, at the Hypnotica 2019 e-textile fashion show, and at a presentation at Microsoft Research.
Atari Women is a research project built upon collecting stories about underrepresented people who were part of the early days in gaming. It is organized in collaboration between the Human Centred Computing (HCC) Section at University of Copenhagen in Denmark, and the Human Centered Design & Engineering (HCDE) Department at University of Washington, Seattle, USA.
After a few rounds of brainstorming and sketching, our team agreed upon some design concepts. I created a costume design rendering for us to reference during our build process.
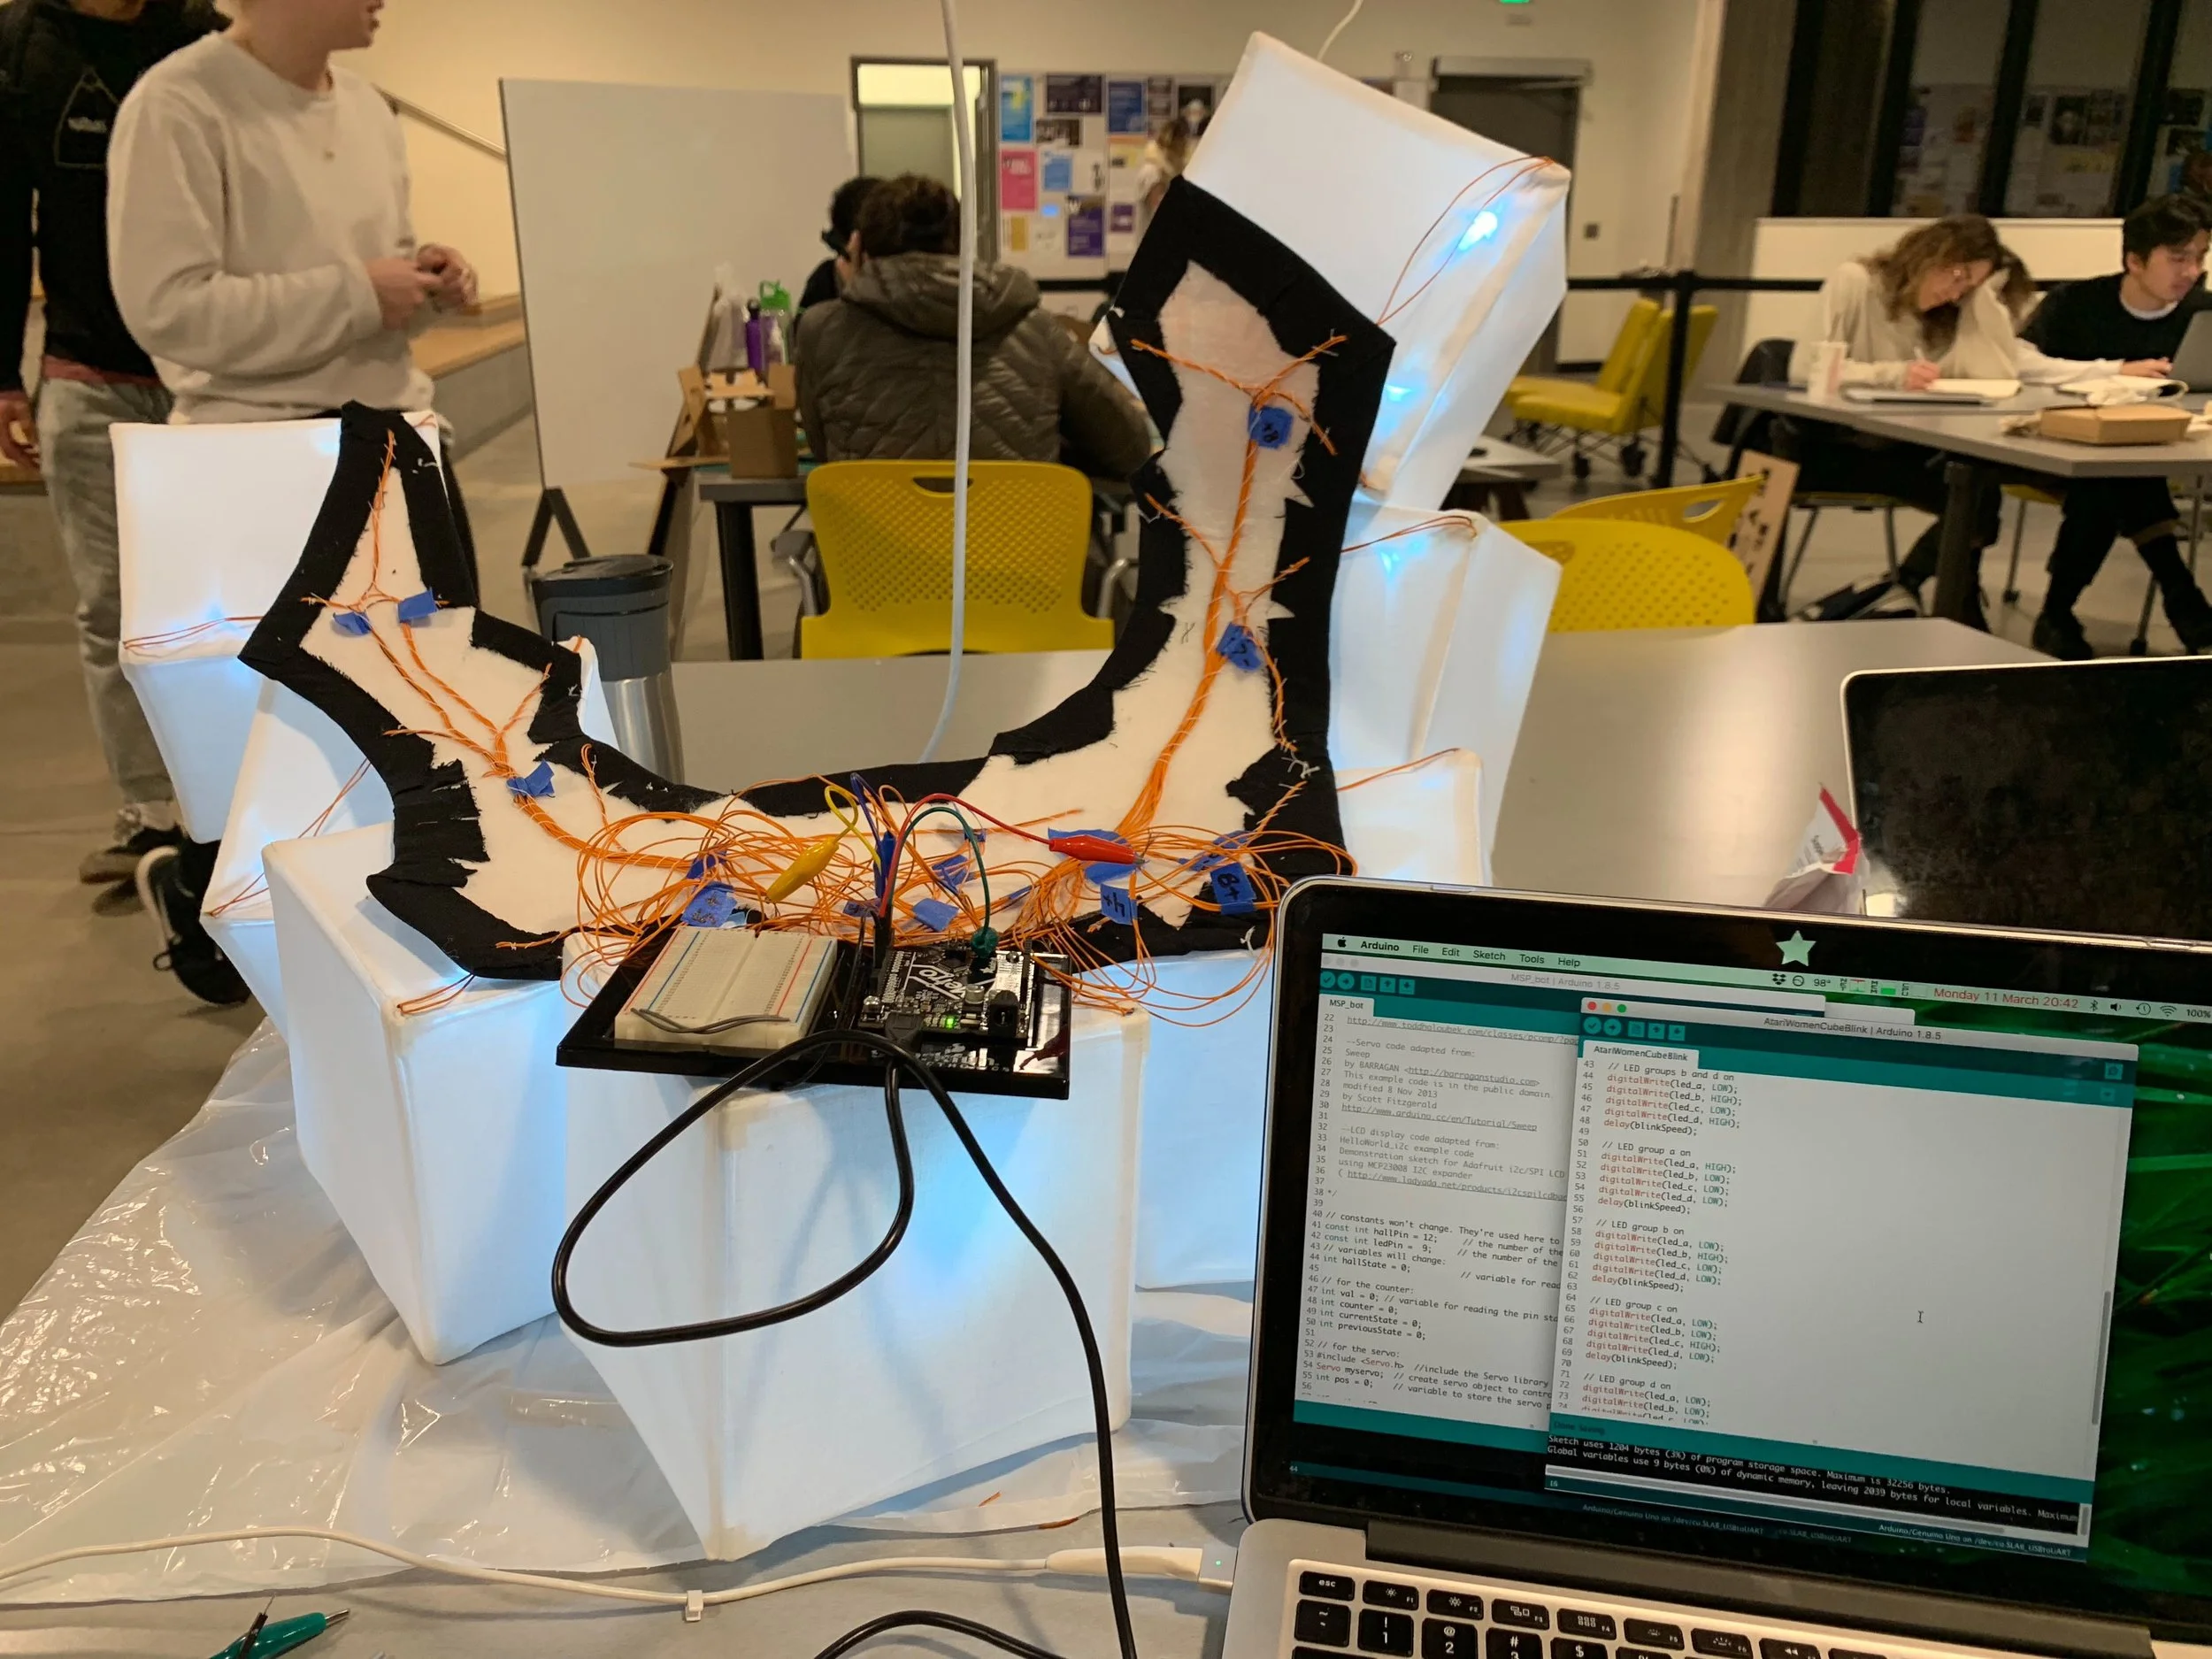
The inner structure of the cubes is made of acrylic rods and 3D printed corner joints.
Each cube is fitted with super bright LED lights that have been soldered onto long wires, and covered in lightweight white fabric.
With the cubes attached to the custom thermoplastic shoulder base, I organized the wires and programmed the blink sequence in Arduino. The finished cube structure runs on an Arduino Lilypad.
The rainbow Atari logo on the front of the coveralls is created with NeoPixel color changing LEDs, and runs on a separate Adafruit Flora board.
She made an appearance at the Atari Women project’s first public event: a panel discussion at ECCC in 2019.
Our costume was part of the DXARTS Hypnotica 2019, an e-textile fashion show in Seattle.
The 8-Bit heroine was a featured artifact in the "Living with Tech: Atari Women & Beyond" exhibit at Living Computers: Musuem + Labs in Seattle, WA.
A collection of small e-textile projects and protoypes.
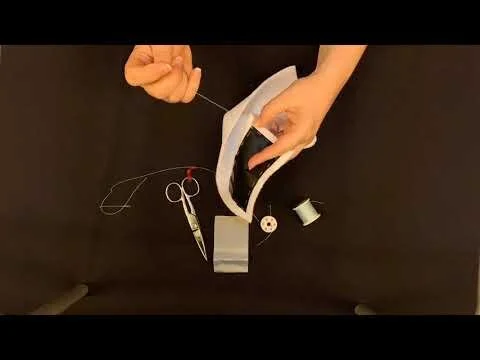
Timelapse of creating a soft pressure sensor.
This functional speaker is made of fabric, copper wire, and magnets.
Pressure sensitive and conductive fabrics and thread complete a circuit that makes the cat's eyes light up and flicker when you pet it.
Experimentation with different materials and designs for textile-based simple circuits.
A simple pressure sensor made of velostat, conductive thread, and tape. In this instance, it is controlling a small vibrating motor via an Arduino Lilypad.
Small projects and prototypes, using digital fabrication tools and techniques.
This lamp is made of laser-cut 3mm birch plywood, designed to fit a ubiquitous Ikea pendant lamp base. The pieces fit together with a slot-and-key design so that no hardware is necessary to assemble the shade. The light bulb is surrounded by a custom designed diffuser 3D printed out of glow-in-the-dark PLA, so that it continues to glow softly through the star cutouts after the light is switched off. All pieces modeled in Rhino and Illustrator. The original process description of this project is on my github.
A small box I made of FR1 printed circuit board material, modeled in Onshape and fabricated on a Bantam 3-axis desktop CNC. The tolerances on the tab-and-slot joints are tight enough that this box snaps together without any glue or fasteners. The original process documentation for this project is on my github.
A press-fit construction kit consisting of two repeating laser-cut shapes. I made a subsequent version of this project using parametric modeling to resize the cutouts for different thicknesses of cardboard.
This is a prototype of a physical computing project for my aquarium. It's a feeder system for my goldfish, which trains the fish to interact with the device in order to receive a treat.
The device consists of a hall effect sensor that detects a movable magnet on the other side of the aquarium glass, an indicator LED, a servo that turns a 3D printed food pellet dispenser, and a small LCD screen that tracks the fish’s progress via a “boop counter.” The prototype is running on an Adafruit Metro board.
I am still making changes and improvements to this prototype, as I observe how my goldfish naturally interacts with the magnet button and how I can fine-tune the system for him. In the future, I intend to also implement a “vacation mode” feature that will feed my fish automatically at regular intervals for a few days while I am away.

Research

costume & craft